Thursday, December 29, 2011

Read the Bible in 2012!

A woman in Sunday School said it the best: "Just by reading the Word of God, I'm seeing changes. I'm not working on anything, but the Holy Spirit is working in me!"

To be totally honest, I've never liked the "Read the Bible in a Year" reading schedules. I would make it to Leviticus, but after I realized that I wasn't actually digesting anything that I was reading, I would give up. I am strongly against the idea of force-feeding the Bible so that people become bored of it. The Bible should never be boring!

On the other hand, perseverance is a valuable part of Christian discipline. Even when it's challenging, we will benefit from reading the Word of God, provided that we read it correctly. (Definition of "correctly": Seeking to change, looking to hear from God, allowing God to be exactly who He is without censoring the parts of His character that we find unpleasant.)

The biggest difference for me has been reading the Bible as a group. I am forced to read correctly when the people around me are discussing the daily readings, and when we are seeking out God's message corporately.

If you would like to read the Bible this year, let me recommend that you get a group together. Pull together some friends with the same desire. Hold each other accountable. Expect God to act. Discuss, journal, and apply everything that you learn. Love the Bible in all of its occasional mystery and constant wonder.

If you would like to read the Bible chronologically, you may find the curriculum that I'm writing for Sunday School useful. I'm writing it week-by-week, so expect typos and occasional mistakes. On the first week, there is a reading schedule, commitment letter, and the first week's fill-in-the-blank outline. Not everyone benefits from filling in the outline, so don't sweat it if you don't choose to use it. For a full description of the curriculum, click here. For the resources to get started, click here. I will admit that it's a lot of printing, but I believe that anything that helps other women to read, understand, and love their Bibles more is worth paper and ink.

If you decide to start a Bible Reading Club, let me know by leaving a comment or Emailing me. I would love to start a group on Facebook so all of the groups may be encouraged and challenged by each other.

I'm not going to play down the challenge. It will be difficult, but it will be oh! so worth it!

Tuesday, December 20, 2011

My Favorite Hat Pattern (Knitting)

I finally made myself a hat, and I have been wearing the mess out of it. It's a slouchy beanie style hat, but I can fold the ribbed edge and wear it as a typical toque. You can find the pattern here.


It's a very warm, versatile hat. It's loose enough that it doesn't mess up my hair too much. Depending on your knitting style, you may need to adjust needles or reduce the cast-on stitches to keep it from being too loose.


Monday, December 12, 2011

Homemade Christmas: Bath Salts and Sugar Scrubs

Blog #4 of the Imperfectly Pinterest Series.

I wrote last week about how to make lotion bars. This week's post is geared toward last minute gift ideas for groups. The only ingredient that may be difficult to find is the essential oil, depending on where you live. I ordered everything from New Directions Aromatics (who did not pay for me to mention their name or give me anything free, though they are welcome to do so.) because we live nowhere near anywhere.

For the sugar scrub you will need:
  • 3 cups of granulated sugar
  • 1 plus 1/8th cup oil (Olive oil, sunflower oil, etc. Any oil that has a nice smell will work. I don't recommend vegetable oil.)
  • About 10 drops of essential oil per recipe.
This is really easy stuff to make. All you need to do is mix it together. This recipe will make three large jars or six small (2 oz.) jars. The most expensive thing is finding packaging. I ordered twenty small jars a few weeks ago, so packaging really wasn't an issue. You can find some pretty cute glass jars at Dollar Tree, but if you're making a whole lot of them, that will be pretty expensive. For the really small gifts I packaged it in small baggies. I printed labels onto small shipping labels that I cut in half width-wise. I recommend putting the ingredients on the label so recipients can be aware of any allergens.

To use the scrub: Rub on rough, dry skin and rinse to reveal smoother skin.

This stuff really works! Living in such a dry climate, I have a feeling that sugar scrubs may be a pretty regular ritual.

Bath salts are even easier. All you need is salt and fragrance. The big question becomes what type of salt, which is probably going to depend on what types of stores are near-by at this point in the game.

I used:
  • Half Epsom Salt (I used some fine grain and some typical, coarse salt)
  • Half Dead Sea Salt
  • Plus I added Dendritic Salt to help it maintain its fragrance. You only need a small amount (5%-10% of the total) for it to do its job.
  • Essential oil. I added it until I was happy with the scent.
In a pinch, you can use half Epsom salt and half ionized salt, or you can use Sea salt in place of the Epsom salt. I will say that the Dead Sea Salt and Dendritic Salt make a difference. I used some of it, and it was the best bath salt ever.

All you need to do is mix it together and package it. Some people add color, but I haven't added any coloring to any of the gifts I've made this year because I wanted to keep it simple and reduce the risk of allergic reactions.

I made lots of these, so I packaged them in small baggies. I know that I could have packaged them up super-cute, like this gal did with her sugar scrubs:
Pinned Image

But that would have defeated the purpose of easy, inexpensive gifting. (I mean, hand cutting felt flowers? They're really cute, but c'mon!) I do recommend including a label on the package, though. After wrapping in tissue paper (as in the first pic), they were still pretty cute.

To use bath salt: Add 1/4 to 1/2 cup of salt to warm bath water and relax.

I hope that these ideas help you as you attempt to complete your gift-giving ritual this year. Let lots of people know that you care this season with imperfect, heart-felt gifts.

Monday, December 5, 2011

Homemade Christmas: How to Make Lotion Bars

Blog #3 of the Imperfectly Pinterest Series


A couple of weeks ago, I counted up the number of gifts that needed to be purchased. I realized that there were a lot of people who work with my children each week, and I became a bit concerned. There are almost thirty people who interact with my precious children when you include teachers, therapists, Sunday School teachers, and AWANA workers! I don't know about you, but I am not totally sure how to pay for thirty teacher gifts.

So I'm making them.

After searching the internet, mostly with the help of Pinterest, I discovered a ton of bath and body products that looked pretty fun.
My favorite idea was homemade lotion bars. These bad puppies are made from beeswax, cocoa butter, oil, and fragrance. When you rub them in your hands, a little melts into your hands, and you can rub in like lotion. Although the product is a little greasier than lotion, it's also more effective on dry, chapped skin, and you can leave it in your car when the temperatures get crazy low without fear of freezing. (This may come in handy more up here than where you live.)

Update: I do want to mention that lotion bars really aren't lotion. They are definitely waxy, and are perfect for using on your hands and feet before putting on socks and gloves, and are also great for protecting your hands against repeated hand-washings if you use it just before washing your hands. But it really isn't a regular lotion.
The recipe that I found is extremely simple:
  • One part cocoa butter
  • One part beeswax
  • One part oil, such as sunflower or olive oil (I reduced this to 2/3 of the other two ingredients to reduce greasiness and raise the melting point, but I think that 3/4 or above would have been better)
  • A small amount of essential oil (About 6 teaspoons per kilo of cocoa butter/beeswax)


After deciding to make lotion bars, sugar scrubs, and bath salts, I went online to find the products that I needed. After quite a bit of Googling and keyword brainstorming, I came across New Directions Aromatics. I ordered a kilo of wax, a kilo of cocoa butter, and 33.3 oz of sunflower oil. I also ordered two tray molds that make 16 square bars each. In the same order I purchased what I needed for bath salts. I am going to write a blog on the bath salts and sugar scrubs next week, but if you plan on making them, you may want to purchase the items along with lotion bar ingredients.

For bath salts you can use almost any type of salt, but I used 2 parts Epsom, 1 part dead sea, and 1 part dendritic salt. I bought a kilo of Epsom and 1.1 lbs of the other two. You'll also need essential oil or fragrant oil.

For the sugar scrub, the only things that you will need to buy online are the oils. The recipe that I'm using calls for three cups of sugar with 1 and 1/8 cups oil (again, sunflower) with three cups of sugar. Thirty drops of essential oil are required for the recipe.

Even when making all three items, you won't go through a bottle of essential oil unless you're making a ton of them!

As far as molds go, I ended up using a cookie sheet that I bought at Joann's Fabrics on sale. Each cavity has a different snowflake shape. I also made three trays worth of square bars to give to other people that I would like to let know that I love them, but I can't afford to buy everyone I love a $50 giftcard.

One warning: Make sure that you wear old clothes and use kitchen supplies that aren't particularly important to you. This stuff leaves oil spots if you splash some on your clothes, and it is nearly impossible to clean it off of spoons and measuring cups, though it can be done.

Now, for the actual steps:
  1. Melt the cocoa butter and beeswax in a double boiler, or, as I did, a Crock Pot.
  2. Remove from heat or turn the power off your Crock Pot, and add the oil and essential or fragrant oil. (If you are using more than one scent, you can pour the mixture into separate bowls after adding the main oil and before adding the fragrance.)
  3. Pour into molds and carefully place in the refrigerator. If not all of the mixture fits into your molds, you can leave it in the Crock Pot with it set on "warm," so it stays melted. Do not put the bars into the freezer, or they may crack!
  4. Wait until the bars are completely hardened, and remove from the molds.
  5. Package the bars. I had a couple of ideas for packaging. One was to wrap them in foil and press the foil so it shows the pretty design. For most of them, I will probably put them in small treat bags with swing tags that I made from printable business cards that I bought from WalMart. The reason that I'm leaning toward this option is so I can explain what they are and let the recipient know what the ingredients are in order to prevent allergic reactions.

Here is a picture of what I put on the tags:
Update: I recommend changing the instructions based on what I now know about the texture of the final products Rubbing in completely is not going to happen.

I hope that this tutorial helps you if you have decided to make some of the gifts on your Christmas list next year. To tell you the truth, I enjoyed making these things so much that I have considered starting my own little company. "Consider," being a key word. 

A Monday Without Zumba

I taught my last Zumba class last week. My certificate ran out, and I wasn't making enough to justify renewing it. I really enjoyed the experience of teaching classes, and I have gotten to know several wonderful women because of it. In all actuality, that was the primary reason that I started teaching in the first place. I don't have many opportunities to meet women outside of church, so I have to find ways to get into the community in order to be around other circles of women. Zumba was extremely effective at the task.

I met some fantastic women. They are so sweet, in fact, that they gave me an ornament and a good-bye party. Although the idea of freeing up some time to write and be with my family is really nice, I am going to miss the women with whom I have spent almost every Monday night for a year and a half.

Each phase has surprises of its own, and I look forward to seeing what the next phase holds.

Tuesday, November 29, 2011

Hannah's Christmas List: Trash the Dress

I mentioned in a previous post that I asked Edwin for a trash-the-dress photo shoot as a Christmas gift. I loved the idea of actually getting to wear my pretty wedding gown one more time, and I also loved the idea of having some pictures of me in front of a camera. (I'm usually the one taking the photo.)


Allow me to say this: If you've been contemplating a trash-the-dress, I highly recommend that you follow through. We were able to remember our wedding day, and we now have lots of fun photographic evidence that we really like each other. (It's a great thing to remember.) It would be an excellent anniversary gift from a husband to wife, or a great Christmas present. Just a thought...


We also had some family photos taken. Marriage is about more than romance, after all. Plus, our kids are really cute, and they make us look good.


If you live in the North Country, and are in need of a photographer, allow me to recommend Krista. She does a fabulous job. If you go to her website, you can also check our her ridiculously amazing cakes. They're incredible!

Friday, November 25, 2011

$20 for 3 Christmas Windows

The second blog in the Imperfectly Pinterest Series.

After looking through several ideas on the Better Homes and Gardens website and friends' Pinterest boards, I decided to give myself a challenge to see how far I could stretch $20 and change when it comes to Christmas decorations.

I started with this:


This is what I was able to purchase, mostly from Dollar Tree:


(The lollipops were to reward my children for being semi-patient while I calculated, recalculated, and recalculated again.)

I used the directions from this tutorial that a friend of mine pinned on her Pinterest board to create a mini-wreath. I cut the wire hanger in two to make the wreath smaller because I didn't want to use that many ornaments, and I didn't feel like a large wreath was needed.


 I seriously debated the gardland, but I have decided that I like it around the curtain rod and a part of a bow. Here is how the window turned out:


I noticed that there is a trend in hanging ornaments everywhere, so for a simple decoration on the kitchen window, I wrapped the curtain rod in some ribbon that was left over from my wedding and hung a few ornaments at varying lengths. I have to say, it looks much better in person.


One of my favorite ideas from bhg.com was to hang ornaments in picture frames. The round ornaments in the frames are also left over from my wedding. The middle angel ornament was given to us as a wedding gift. The frames were originally black, and I wish I would have just bought them in white, but I didn't, so I painted them.


I hope that your decorating is off to a great beginning, or that it will be when you get to it. I also wish you a pepper-spray free holiday season. I mean, seriously? Does that video game cure cancer or something? Okay, ranting over.

Happy decorating, celebrating, shopping, eating, and (oh, yeah!) worshiping Christ this Christmas season.

Tuesday, November 22, 2011

How to Make a Photo Canvas

Blog #1 of the Imperfectly Pinterest series.

Edwin requested some Scripture for his office walls as a birthday gift. This is how he became the first family victim of Pinterest. I found the perfect tutorial on a friend's board, and decided to put it to use as a birthday gift for my wonderful hubby.

Here's how it went:

1. Get your supplies together. You'll need-
as many blank canvases as you need (I went with 8x10)
photos printed in the same size as the canvas (You may need to trim the adges. The photos should be slightly smaller than the canvas)
Mod Podge
Brushes, I went with sponge brushes
Black paint
Ribbon or (better) scrapbook paper (If you use ribbon, I have come to the realization that it would be best to prime the edges and sides of the canvas with the black paint in order to reduce the appearance of gaps.)

2.. Mod Podge the canvas. I just used the extremely cheap sponge brushes.


2. Press the photo onto the canvas.


3. Turn over the canvas, and press out all of the air bubbles.


4. Mod Podge the sides.


5. Cover the sides with ribbon or 4 strips of scrapbook paper cut to almost the same size as each edge. I now realize that the scrapbook paper works better.


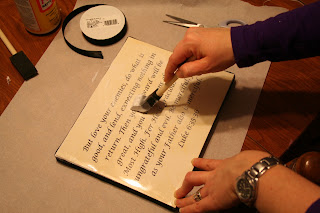
6. Mod Podge the whole photo. I used a thick coat and made a circular motion that made the appearance of brush strokes. That works well.


7. Let it dry... Then dry sponge the edges with the black paint. I first used a sponge brush, but I then discovered that a makeup applicator sponge is much better at getting the light effect around the edges.


8. Allow to dry. Be extremely happy with your results, no matter how imperfect they are.
The photo below demonstrates the difference between the sponge brush application and the makeup sponge application.

Make sure that you check out the original, and far more perfect, instructions on Blue Cricket Designs. Edwin was extremely happy with his birthday gift, which was really the point, after all.

Sunday, November 20, 2011

Pique Your Pinterest

I recently joined Pinterest. I have mixed feelings regarding the new social media. On one hand I really don't like the fact that there is a new guilt-tripping mechanism that is trying to force me to spend every waking moment organizing, cooking, decorating, and crafting. Actually, I'm not totally sure that there would be time for sleep if I tried to tackle every project that brought on guilt.

On the other hand, the holiday season has a strange way of making me wish that I could build a table from a door or cook the perfect Christmas turkey for $3 a person.

This brings me to a place where I am trying to wade through the ridiculous projects in an attempt to find the accomplishable ideas that will actually benefit me and my family... as opposed to making more work and covering my entire home in glitter.

You are invited to join me on this tumultuous journey through the domestic battleground as we begin a series that I have affectionately titled, "Imperfectly Pinterest."

Thursday, November 17, 2011

Edwin Was Born!

Yesterday was Edwin's birthday. God has blessed this little planet with Edwin for 32 years now. He never ceases to amaze me with the amount of wisdom and maturity he has collected in that short time. I have known him for nine of his 32 years, and I desperately hope to have many, many more opportunities to celebrate his addition to the world.


For Christmas I gently requested (or nagged, whichever) a trash-the-dress photo shoot. We also had a few family photos taken. . I plan on blogging about the trash-the-dress experience soon, but I wanted to share some of my favorites that feature my insanely handsome
husband now. For more information about the photographer, check out her website here. I must admit that I struggle with jealousy for her abilities, which include photography and gorgeous cake decorating.

Thursday, November 10, 2011

A Little About My Brother.

My brother has been living with us since September. He is taking a semester from seminary to come and help out our family and church. I must admit, I didn't expect him to be as helpful as he's been. He is constantly seeking out opportunities to be nice to us. If he sees something that needs to be done, he usually jumps right in and does it.

I haven't lived anywhere near my brother since graduating from high school. The girls knew him... sort of, but they didn't have a real relationship with him. It has been great to get to know him again, and for the girls to get to know him for the first time. (I think Edwin likes having him around, too.)


It's no small thing that he took time out of his life to come and live with us for a few months. Micah is going to be a great pastor, a great dad, and he's already a great man. I'm so thankful for you, bro. I'm not looking forward to when you leave, but I am tremendously grateful for the time we get with you.

Monday, November 7, 2011

Google

My brother just tried to tell me a riddle. I thought about it for a few seconds, but seeing as I had a laptop handy, I decided to Google it. Because thinking is just so last century.

The man who made it doesn't want it. The man who bought it doesn't need it. The man who needs it doesn't know it.

What's the answer?

A coffin.

You have to respect a company whose name has become a verb. When we went to missionary training, we were told that it would be a good idea to "Google yourself." I don't care how mature of a Christian you are, that's going to crack you up.

The availability of information is an amazing, and incredibly dangerous, development of our time. There are very few secrets in our world. Saturday night we were watching the post game show after the Alabama-LSU game (I'm not ready to talk about the game), and Kirk Herbstreit stopped the question because he had just felt an earthquake. Before anyone could have reported it, before the earthquake had even concluded, thousands and thousands of people were aware of it.

I personally enjoy the speed with which I can retrieve the weather report, price comparisons, and product reviews. I like you, Google, even if you do ruin my brother's attempts to befuddle me. I'm more than a little scared of you, though. Do you see everything? Do you spend your life going to and fro across the earth, looking for information to organize by keyword?

I would like to continue on my little rant, but this blog's server is owned by the Google dominion, and I've seen enough movies and read enough books to know that you don't mess with the technological powers that be.

Did you hear that, Google? I'm going to bed now, a place where I'm pretty sure that you can't see me. At least, I hope not (insert Twilight Zone theme music here).

Monday, October 31, 2011

Dressin' Up and Showin' Off!

DeLaynie wanted to be a princess this year... just like last year. I'm almost willing to bet she's going to want to be a princess again next year. I went to Target.com and looked for a princess costume on clearance, and a Snow White dress fit the bill.


Ella wanted to be everything that she saw. She wanted to be a puppy, a monkey, a piggy, a princess... and then I shut my computer. Then I found a butterfly costume on clearance, and made the suggestion. She went for it! I was pretty happy about the situation. (So was she.)


Uncle Micah won "Most Confusing Costume" at the fall festival. Okay, not really. But only because we didn't have a contest. He was actually Prince Ronald from one of the girls' favorite books, "The Paper Bag Princess".


Ella always enjoys the games at the fall festival. She also enjoyed the perks of being the pastor's daughter and grabbing way more than the standard amount of candy per turn.


DeLaynie doesn't like the games as much because her favorite thing in the world is a bounce house. But she likes the games and getting candy enough to take a few breaks.


"Look! Lemonade!"


Sassy little princess!


We had a great time, and now the girls are thoroughly asleep. I'm currently taking parent tax (i.e. raiding the kids' candy stash).